I'm an Electrical Engineer by training. Skilled in the arts of V=IR and all variations upon it. Over the years, I've specialized more and more on audio, and taken a little interest in microcontrollers and so on.
My latest brain excercise has been dabbling with an ESP8266 as a fancy web-to-uart device, that will then communicate with multiple MSP430 nodes. Each of these nodes is on a separate pcb, distributed by cat5 cable that's transferring slow UART data and distributing 12V.
So - I need to lower 12V to 3.3V somehow. Easy, wonderful, but I really don't want to burn a lot of power doing so, all for the sake of powering an ultra low power MSP430! In 99% of the cases, it's likely that the power supply will consume more power than the actual processor!
So, a short question to the Shenzhen hacker crew got me a few devices to look at. Key careabouts was that there's a chance I'd need a lot of current from time to time (think of LED's), to look at the Quiescent current (and make sure it's isn't magnitudes higher than the processor! and then try and find as small an inductor as possible. I even took a moment to ask the mighty force of TI!
And yes, I considered an AMS1117-3.3! (it's an LDO, it's current consumption would be too high)
Part Number
MC34063
XL1509
MP1584EN
LM2596
TPS562201
Max Input Voltage
40
40
28
40
17
Max Current Output
1.5
2
3
3
2
Switching Frequency
100
150
1500
150
560
Recommended inductor for 12 to 3.3
17 (@750mA)
47
10
33
3.3
Efficiency
75%
QuiescentCurrent
4mA
2mA
100uA
5mA
0.35mA
Package
SOIC8
SOP8L
SOIC8E
TO-263
Sot23-6
Taobaolowestunitprice (USD)
0.02
0.07
0.07
0.23
0.41
ebaylowestunitprice
0.05
0.25
0.28
0.2
nA
My conclusion was that the MP1584 was the best of the lot. Cheap enough with Taobao, high enough input voltage, plenty of current etc.
Do you have any other experiences? other solutions I should look at?
Despite a lack of new products recently, development continues when possible. Typical tools we use for development include:
Cadsoft Eagle 5.11 (Schem and Layout)
TI Tina (simulation)
TI Code Composer Studio for MSP430
Arduino / Energia
Goldwave (arbritary audio recording and capture)
Anyway, one of the pains of my life are creating new libraries for new components to be used in Cadsoft Eagle. I used to provide a service to make them for other people, but I've found over the years that as my day job has become more time consuming, and a 4 year old in the family, my spare time to development has been reduced.
As a consequence, I started looking for others to make libraries for me. I quick look over at fiverr.com, and in between all the people willing to make graphics for me, I found a supplier who'll make libraries for $5! (https://www.fiverr.com/mochini77)
His work is excellent, and he delivers a quality library very quickly. However, it did make me think about what I really want in a library, in terms of the meta-data. A good library provides more than just the basics for schematic and layout. So, without further ado, here's my "I want this" list.
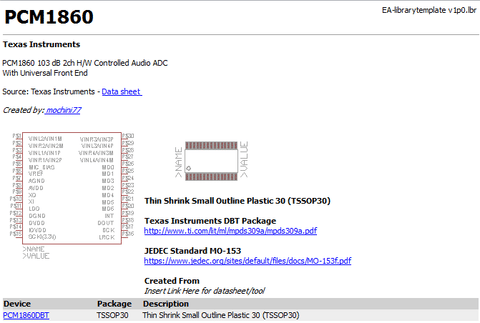
Links to the datasheet
Full part number (including package suffix) that get's exported to BOM tools easily
Source of footprint data (e.g. datasheet? Jedec standard?)
Version control with revision data (e.g. V1.1 - Updated pad width due to manufacturing issues)
Devices with multiple control methods (I2C/SPI/Hardware) should have different schematic view diagrams
All the data comes together from the Library description, Footprint Description and Device Description to create a view that looks something like this:
In addition, the library itself has the whole family of devices, and their various control methods as separate devices.
Some great feedback was solicited from the first three posts.
Control Room monitor output should be attenuated 20dB when the talkback microphone is enabled.
Cue output should not simply switch back and forth
Balanced system only required on i/o, entire system needn't be balanced.
Lets address each of these
1 - Control Room Monitor should attenuate 20dB
A simple H pad and a relay thats controlled when the user pushes the push to talk button. It does mean additional connections on the back panel.That feeds the concept that this is a rack mount unit. A remote makes sense, but switching still needs to happen in the rack.
2 - Cue output should not simply switch back and forth
The original switch used a relay to switch between mic and line.
Two people contacted me on facebook suggesting that the cue should be a mix between mic and line.
That suggests that the line in select relay and mute relay are still valid, but a mixer should be set up between the mic and line ins. I figure this could be done using a TL072. Cue mixes don't require 0.000x% THD.
I've defined the behaviour of the buttons so far. Buttons will light up/down etc and control relays that will live on a separate PCB (the same form factor, so they stack nice!)
Signal Flow
Here is the signal flow that I have envisaged. Doing such a relay control board allows me to use it as a mono-differential or a stereo unbalanced. As the control signals are the same too, you could stack two relay cards and have a stereo balanced system.
Line In's can be Stereo 1/4" Jacks, or balanced XLR's.
Negative and Discrete Logic
One of the interesting things I had to wrap my brain around was the negative logic caused by having the line in's muted when both outputs from the 3 button controller were low. Sounds silly really. I was thinking of using NOR Gates and all sorts, when it suddenly dawned on me that it'd be easier to simply set the default for the mute relay to be mute, then whenever either of the SRC controls was high, simply switch to the signal path.
That OR circuit was done using diodes.
A diode drop of 0.7V happens leaving the control voltage of the transistor still greater than 0.7V... actually, BJT transistors are current controlled devices, so it'll partially be decided by the value of R3.
Selecting Which Microphone To Use
The easiest path here is to use a front panel switch to select between the 3 mics available
Front Panel Electret Microphone
Rear Panel XLR Input
Remote Control Electret.
This switch can be omitted if you only plan to use one microphone.
In the next entry, I'll cover how I plan to integrate the system with a remote.
With a basic form factor sorted out in the last blog entry, the next step is working out more or less how it's all going to work.
While the signal switching involved could be done using FET's and various CMOS switches, I get far less pushback from the community if I suggest good ol' relays.
With that mind, I decided to reuse the hardware that was designed for the Mic Pre Frontend controller.
However, the switching characteristics now have to change, so it means a small software rewrite. The relays and signal path also need to change.
At a high level the following things have to happen.
When the Push-to-talk button is pressed:
Mute the speaker (in case of feedback)
Switch output path from line-in audio to microphone input
When either of the audio source switches are pressed
If pushing one that is currently off, change input source
if pushing one that is already enabled, mute both.
The interesting thing with reusing the mic pre front panel board is that the LED's are directly connected to the outputs of the board. This means when you want to mute the two sources, you have to do it ONLY WHEN BOTH OUTPUTS are 0. Some additional smarts on the relay board are required.
In the next entry, I'll cover the audio signal chain of the system.
In a recent discussion with an old friend(JRMintz on the usual groupdiy.com) he mentioned the need for a talkback controller.
Some kind of device that could be used to switch the microphone to pass to the live room. Think of it as a push to talk switch with a microphone.
At a high level, that's simply a dpdt switch that either sends the mic signal through, or ground. Real simple.
But, thinking this through, I decided to expand the idea a little with the following features
Onboard electret microphone, so you don't need to burn a waste a nice dynamic mic
Onboard Microphone Preamplifier for External XLR or Electret Microphone
Audio source switching (so it could be used in a headphone mix path)
Select one of 2 audio sources by default, which get muted when microphone is enabled
Mono Balanced or Stereo unbalanced support per relay card
Not all studio's run their talkback systems in stereo, nor do they run them balanced.
Remote button or remote button/mic combo.
Now lets talk a little about form factors
Rack Mount unit - simple unit that has 3 buttons, an electret mic and a small integrated speaker and amp.
Rack Mount Unit + External interface with integrated Mic and single push-to-talk switch.
Rack Mount Unit + Complete Remote Control.
The Rack Mount unit would look something similar to this:
The grill on the left could contain a feedback speaker from the live room, which would ensure smooth conversation between the control room and the live room.
There's a hole for the electret microphone to be mounted behind the panel.
Not shown in the image above are the mounting holes for the PCB's behind.
In the next blog entry, I'll cover the functionality side of things. how things should work etc. This has a huge impact on the software being developed.